Adding User Libraries in Eclipse
by Sophie Engle on Aug 2013
This guide shows you how to add a user library in Eclipse (complete with API documents), and add this library to the build path for your project. This guide also illustrates how to setup your classpath environment variable on the lab computers in case you need to test your code outside of Eclipse. We use log4j in the examples below, but the steps are similar for any third-party library.
Home Computer Setup
The first step is to download and extract the library from its website. For example, downloading and extracting the archive file for log4j v1.2.17 includes the following files:
Tomato:Libraries sjengle$ ls apache-log4j-1.2.17/
INSTALL                      contribs
KEYS                         examples
LICENSE                      log4j-1.2.17.jar
NOTICE                       pom.xml
NTEventLogAppender.amd64.dll site
NTEventLogAppender.dll       src
build.properties.sample      tests
build.xml
Tomato:Libraries sjengle$ ls apache-log4j-1.2.17/site/
apidocs                images                 project-info.html
building.html          index.html             project-reports.html
changes-report.html    integration.html       publications.html
css                    issue-tracking.html    roadmap.html
dependencies.html      license.html           source-repository.html
download.html          mail-lists.html        xref
faq.html               manual.html            xref-test
Tomato:Libraries sjengle$
You need to locate the jar file(s) for the library and where the API documentation is stored. In the above output, the jar file is in apache-log4j-1.2.17/log4j-1.2.17.jar and the directory apache-log4j-1.2.17/site/apidocs contains the API documentation. This will be different for different versions of log4j and different third-party libraries.
Once you know where the files are located, you can add a user library to Eclipse.
To get started, open the "Preferences" window in Eclipse. Navigate to "Java » Build Path » User Libraries" on the left-hand side and click the "New" button. Enter the library name and click the "OK" button (leave the "System library" checkbox alone). Then, you need to click the "Add External JARs..." button to add the jar file. Browse to the jar file(s) required for the library and click the "Open" button. By now, you should be seeing something similar to:
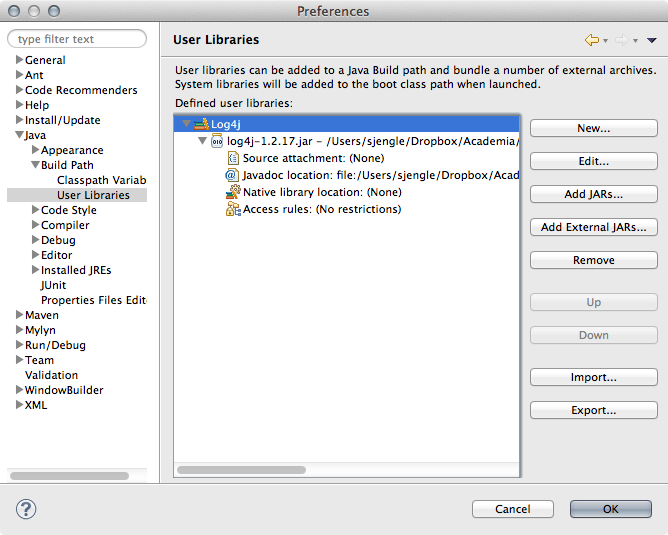
If you know where the API documentation is located on your computer, go ahead and select the "Javadoc location:" entry and click the "Edit" button. Browse to the folder or directory containing the API documentation and click the "Validate" button:
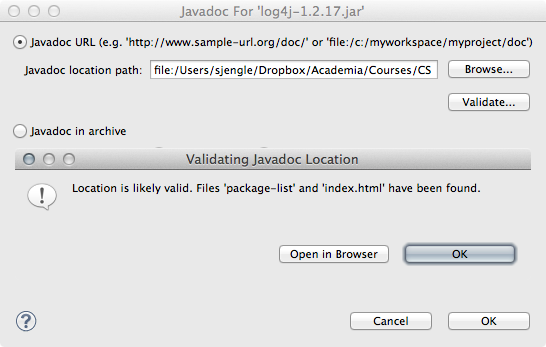
If the location looks valid, click "OK" until you exit the "Preferences" window entirely.
Once you have successfully added the user library, you need to add the user library to your project's build path. See the following sections for how.
Lab Computer Setup
Adding a user library to your Eclipse setup on the lab computers is the same as above, with the exception that you may not need to download and extract the library files. For many classes, the jar files for the libraries being used are provided for you in a public directory. For example, the third-party libraries used by CS 212 are often kept in the following directory:
/home/public/cs212/libraries/
When you setup the libraries in Eclipse, select the library files from this directory instead of downloading your own copy. This will save you some space on your account, which is important considering you have a limited quota on our lab computers.
Configuring Build Path
You need to add the third-party user library to the build path for every project that uses it. (I do not currently know of a way in Eclipse to have a user library automatically added to a project, but you might able able to setup an Eclipse-wide classpath variable that is used instead.)
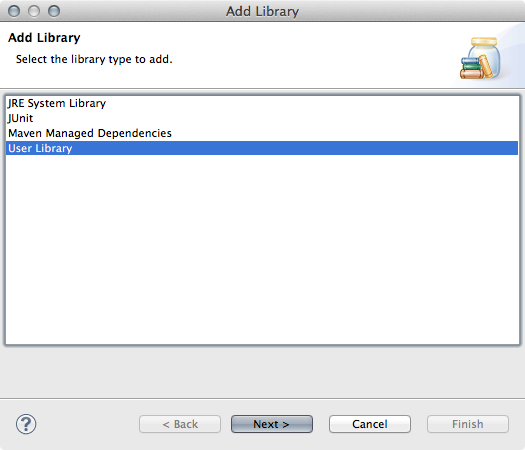
Right-click the project and select "Build Path » Add Libraries..." from the pop-up menu. From the dialog window that pops up, select "User Library" and click the "Next" button.
On the following dialog window, select the user libraries you want to add and click "Finish":
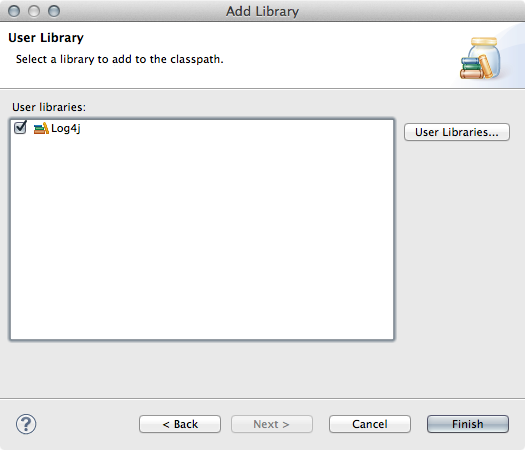
You should see the library listed in your project directory underneath the default Java class files. Remember to do this for every project that needs this library!
Command-Line
If you have to test your Java code on the lab computers via the command-line, you may run into problems since the third-party library may not be included in your jar file. You can bundle the third-party library in your jar file, but this will often result in very large jar files. There are two ways to include all of the necessary jar files to run your code: specifying the jar files with the -cp flag, or setting your CLASSPATH variable.
Specifying the Classpath Flag
If you just need to run your program once, it may be easiest to use the -cp flag to specify all of the locations to find your class files. The format is as follows:
java -cp <paths> <Class> <arguments>
where <paths> specifies the locations of all the jar files separated by the : colon symbol, <Class> is the name of the class file you want to run (must be located in one of the jar files you specified with the -cp flag), and <arguments> are the command-line arguments you are passing to the class specified.
For example, suppose you have a Driver class in project.jar and are using log4j.
java -cp project.jar:/home/public/cs212/libraries/* Driver <arguments>
If you get a java.lang.NoClassDefFoundError exception, then it is likely you did not specify all of the jar file locations or forgot to include a class in your jar file.
Setting Your Classpath Variable
Instead, you can make sure to set your CLASSPATH variable on the lab computers to point to the jar files for the third-party libraries.
For example, the third-party libraries used by CS 212 are often kept in the following directory:
/home/public/cs212/libraries/
If you want to include those libraries in your classpath, you need to open the file .bash_profile in your home directory (or create it if it does not exist) and add the following line:
export CLASSPATH="$CLASSPATH:/home/public/cs212/libraries/*"
You can also setup your classpath to include any jar files in the current working directory by also adding this line:
export CLASSPATH="$CLASSPATH:.:./*"
Once done, execute the following commands:
[sjengle@hrn23501 ~]$ . ~/.bash_profile
[sjengle@hrn23501 ~]$
To test whether your CLASSPATH variable was properly set, do the following:
[sjengle@hrn23501 ~]$ echo $CLASSPATH
.:./*:/home/public/cs212/libraries/*
If you see something similar to above, you should be able to run your Java code without a problem (at least, without any problems caused by missing third-party libraries). To run your code, use something like:
java <Class> <arguments>
where <Class> is the class you want to run and <arguments> are the command-line arguments you want to pass to the specified class. As long as the jar file location with the classes you need are specified in your classpath variable, the above should work. For the earlier example, we would just need to run:
java Driver <arguments>
Java will automatically search your classpath for a jar file containing the Driver class and log4j.