Creating a Google Site
by Sophie Engle on Aug 2013
You can use Dons Apps (a version of Google Apps) to create a Google Site. Google Sites include a WYSIWYG (What You See Is What You Get) webpage editor, so you do not need to write your own code. Go to http://support.google.com/sites/?hl=en to learn more about Google Sites. Go to http://cs.usfca.edu/support/google-sites.html for an alternate guide.
Creating a New Site
You will create this site using Dons Apps. First, you need to log in to USF Connect at https://connect.usfca.edu/ using your USF Connect username and password (not your CS account):

Once you have logged in, click the email icon near the top left of the page:
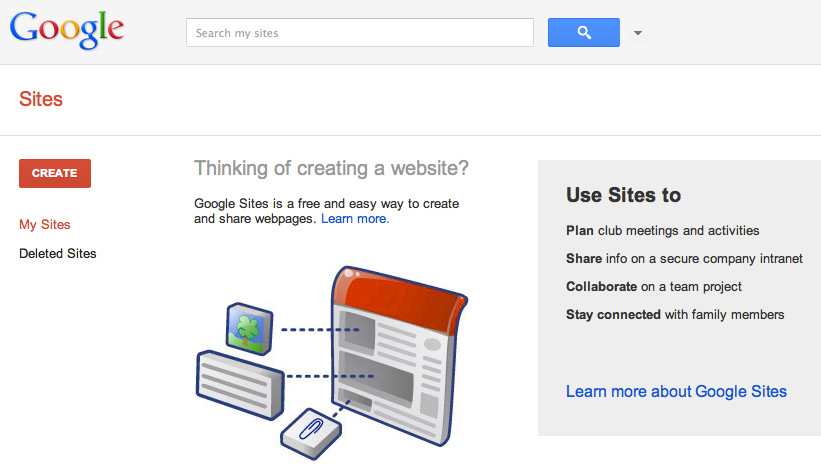
This will open up Dons Apps. You can switch from Gmail to Google Sites by clicking the "Sites" link at the top of the page. You can create your first Google Site by clicking the "Create" button on the left:
Next, you need to give your website a name. I suggest you use your full name as the website name, and your username as the site location:

If you enter your username for the site location, you will end up with a URL similar to (replacing username with your own username):
https://sites.google.com/a/usfca.edu/username
Click the "Create" button at the top when you are done entering the name. We will update the rest of the settings, like the theme, later. You should end up seeing a site similar to the following:
At this point, you have a Google Site! Unfortunately, nobody can see it yet. We will customize the visibility and theme settings of your Google Site next.
Customizing Visibility
We should make sure everyone can see your Google Site. Click on the blue "Share" button in the top-right corner. Once there click the "Change..." link in the "Who has access" section:

On the next screen, select "Public on the web" and click the "Save" button.

After this point, everyone will be able to view your Google Site. Click the "Return to site" link at the very bottom of the page (in the footer) to return to your home page.
Customizing Theme
You may also want to customize the theme of your website. You will need to be in the "Manage Site" page for this part. From your home page, click the "More" button at the top-right corner of the page and select "Manage site" from the menu:

From the "Manage Site" page, scroll the left navigation pane down to the bottom. Click on the "Themes" link at the bottom. From here, you can select any theme you want:

You can preview each theme by clicking the magnifying glass icon. Once you have your theme selected, click the "Save" button at the top of the page. To see your site with the new theme, click the "Return to site" link at the bottom of the page (in the footer). Here is an example using the "Notebook" theme:

The following screenshots use the "Notebook" theme, but you can choose any one you want.
Adding Content
You can edit any page, including your home page, by clicking the pencil icon near the top of the page:
This will open an editor where you can type text. You can modify the appearance of this text by clicking different buttons on the tool bar:

You can also insert media, like images, links, gadgets, and Google documents from the "Insert" menu:

Click the "Save" button when you are done.
Adding Pages
You will likely want to add new pages to your site. Next to the edit button is a pencil icon, that will let you create a new page. From here, you can enter the page name, change the page template, and decide where to put the page:

Depending on your theme, the new page should automatically show up on the navigation bar for your website.