Using Linux via Command Line
by Sophie Engle on Jul 2013
The lab machines run both Windows and Linux, but most classes use primarily Linux. If you are accessing these computers remotely, you will need to get accustom with using Linux via the command line. This all-text interface can be overwhelming at first, but with a few basics you can start navigating the command-line interface with enough knowledge to learn what you need when you need it.
Console
To get started, open up a Terminal window (from the Applications menu) on a lab computer. Alternatively, you may log into a lab computer remotely using SSH (see the other guides). Either way, I will refer to your interface as the console window. The console is a text-based interface where we can enter commands. These commands run programs with input that we provide, and then displays the output of that program.
Before we enter any commands, you should understand a little more about the console output. Look at the window below:

The text in the square braces [ and ] gives you basic information such as your username, the name of the computer you are logged into, and your current directory or folder. In the output above, the user is sjengle and we start in the ~ directory on the stargate computer. After executing the ssh command, we change to the hrn23501 lab computer.
The dollar sign $ symbol in the above screenshot is the prompt. This is where you type in commands (think of it as the computer prompting you for what to do next). In the output above, the command ssh hrn23501 is entered at the prompt. Below it is the output of the ssh program. You can tell the difference between commands you have typed and the output by looking at where the $ is located. If you copy and paste any commands in this guide, do not include the $ prompt symbol!
Manual Pages
One of the most important command you should know is man, which stands for manual. If you ever forget how to run a program, you can look at the manual page (or man page) for that program using this command. If you just type man and press enter, you get the following output:
[sjengle@hrn23501 ~]$ man
What manual page do you want?
You can type man man to get the manual page for the manual program itself. However, it is more useful to get the manual pages for other programs. For example, consider the program date, which displays the current date and time. If we just enter the command date we get back output similar to:
[sjengle@hrn23501 ~]$ date
Sat Sep 15 13:40:29 PDT 2012
Are there any other ways we can use this program? To find out, enter man date at the prompt. You'll see output that looks like this:
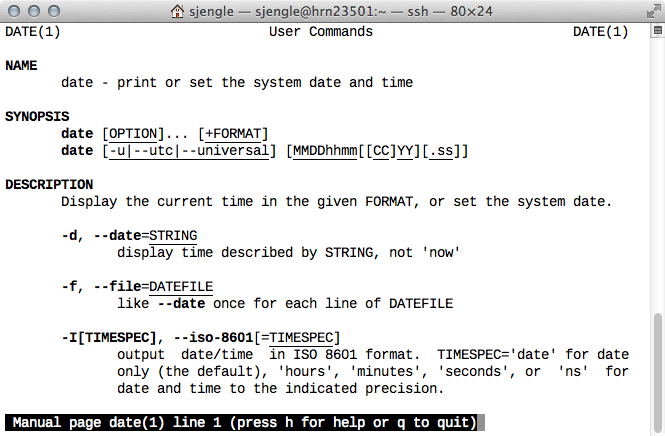
All man pages have a similar format. It starts with a description, gives a usage summary, goes into some details, shows an example, and suggests other similar programs to look at. You can either scroll through the man page with the up and down arrows, or press the spacebar to advance by a page at a time.
Go ahead and scroll down a bit, until you see the -u text:
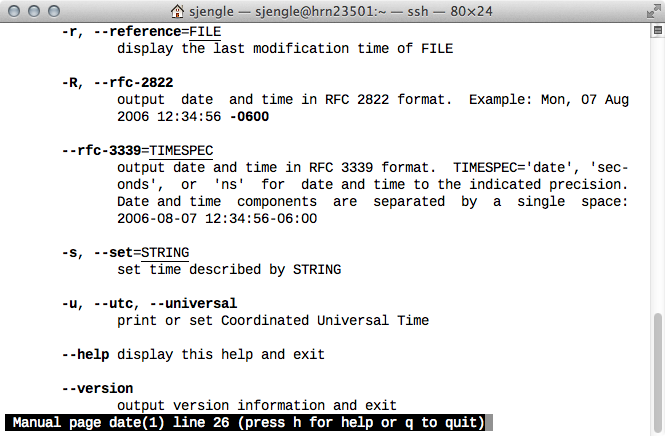
This is a flag (also called a command-line argument or parameter) that we can pass to the date program to change how it outputs the date. The man pages will always provide a list of flags you can pass to a program to change its behavior.
Press q to quit and go back to the command-line prompt. Enter date -u at the prompt to see how the date format changes:
[sjengle@hrn23501 ~]$ date -u
Sat Sep 15 20:40:57 UTC 2012
The following shows the console output after running all of the above commands:

Even seasoned Linux users occasionally forget the flags you can specify to a program, and rely on man pages to look it up.
Absolute and Relative Paths
In the console, you are always executing commands from a directory (or folder). When you first login, you are in your home directory. This is usually indicated by the ~ (tilde) symbol. However, this is just a shortcut. To see the full path of your home directory, enter the command pwd (for print working directory) at the prompt:
[sjengle@hrn23501 ~]$ pwd
/home/sjengle
My home directory is /home/sjengle. This is the absolute path of that directory. To understand this what this means, you need to learn a little more about directory notation.
Think of directories as a tree. The tree has a root directory, which is the very first directory on that system. Inside the root directory, there may be multiple subdirectories (think of them as branches). Just like one branch on a tree may split into multiple little branches, every directory in our system can have multiple subdirectories. The absolute path gives us the whole path from the root directory to the current or working directory (the directory we are currently executing commands from).
The / symbol separates individual folder names. So, the absolute path /home/sjengle indicates that in the root directory / there is a subdirectory named home and in the directory home there is another subdirectory named sjengle.
A relative path is a path given relative to the current directory. There are two special symbols that we can use when it comes to relative paths. The dot . symbol is a shortcut for the current directory, and two dots .. is a shortcut for the parent directory. For example, if the current directory is /home/sjengle, then . is a shortcut for /home/sjengle and .. is a shortcut for /home. You can combine any number of . and .. symbols to build a relative path.
Directory Commands
How do we tell what files and subdirectories are in a directory? For this, we can use the ls command, which stands for list. If we enter ls it will list all of the files and subdirectories in the current directory. For example, we can list everything currently in /home/public directory:
[sjengle@hrn23501 ~]$ ls /home/public
UninstallWinClient.exe  cs315  cs682                   math367
appengine_launcher      cs326  cs685                   nltk-2.0b6
cs110                   cs601  gnome3disable.sh        nltk_data
cs112                   cs636  google_app_engine       nx
cs171                   cs652  google_app_engine1.3.4  pizza_night
cs212                   cs662  google_app_engine1.4.1  profile.vbs
cs221                   cs680  google_app_engine1.4.3  projects
(The exact output may change over time.)
You can see there are several subdirectories in the root directory. However, this is only part of the picture. There are several hidden directories and files as well. To show hidden files and directories, you have to pass the -a (all) flag to ls as follows:
[sjengle@hrn23501 ~]$ ls -a /home/public
.                           cs315              google_app_engine1.3.4
..                          cs326              google_app_engine1.4.1
.com.apple.smb.streams.off  cs601              google_app_engine1.4.3
.snapshot                   cs636              math367
UninstallWinClient.exe      cs652              nltk-2.0b6
appengine_launcher          cs662              nltk_data
cs110                       cs680              nx
cs112                       cs682              pizza_night
cs171                       cs685              profile.vbs
cs212                       gnome3disable.sh   projects
cs221                       google_app_engine
Above, you can see directories and files that were hidden before. There are several other flags you can pass to ls as well. For example, you can see the result of the --color flag in the screenshot below:

We can change our current directory using the cd (or change directory) program. For example, enter cd /home/public at the prompt and notice how the text in the square brackets [ ] changes:
[sjengle@hrn23501 ~]$ cd /home/public
[sjengle@hrn23501 public]$
Also, if we execute ls from this directory, we show the same thing as we did earlier when we did when entering ls /home/public at the command line. That is because our current directory has changed, and when given no parameters, ls will always list the files and subdirectories of the current directory. (See the above image for an example.)
If you wanted to change back to your home directory, you can do cd ~ from anywhere. You can also use relative paths. For example, cd .. changes to the parent directory. For example:
[sjengle@hrn23501 public]$ pwd
/home/public
[sjengle@hrn23501 public]$ cd ~
[sjengle@hrn23501 ~]$ pwd
/home/sjengle
[sjengle@hrn23501 ~]$ cd ..
[sjengle@hrn23501 home]$ pwd
/home
You can create and delete directories using the mkdir (make directory) and rmdir (remove directory) commands. For example, try the following:
[sjengle@hrn23501 ~]$ cd ~
[sjengle@hrn23501 ~]$ ls
cs110  cs212  cs326  public  web
[sjengle@hrn23501 ~]$
[sjengle@hrn23501 ~]$ mkdir temp
[sjengle@hrn23501 ~]$ ls
cs110  cs212  cs326  public  temp  web
[sjengle@hrn23501 ~]$
[sjengle@hrn23501 ~]$ rmdir temp
[sjengle@hrn23501 ~]$ ls
cs110  cs212  cs326  public  web
(The exact output will differ depending on the contents of your home directory.)
You cannot remove a non-empty directory. If there are files in that directory, you must remove them first. We'll discuss various commands related to files next.
File Commands
There are several commands for displaying and manipulating text files. For example, you can use the cat command (concatenate and print) if you just need to see what is in a small text file. Consider the following example:
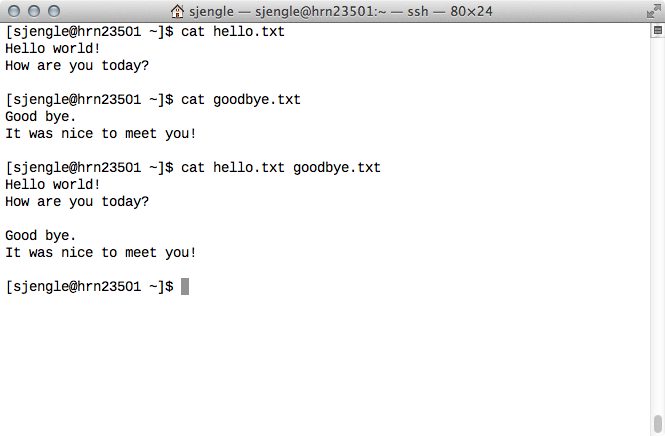
(For the above example to work, you need to already have files hello.txt and goodbye.txt in your directory.)
You can also use cp to make a copy of a file, mv to move a file to a new location, and rm to remove a file entirely. For example:

It can be slow and tedious to remove one file at a time. Next, we discuss how to use the wildcard symbol to speed up the process.
Wildcards
We can use the * (asterisk) symbol as a wildcard in many commands. (The "wild card" in a card game is a card that can substitute any other card in the deck.) The asterisk is like a placeholder, and using it to form a pattern can match multiple files at once. For example, if we list all of the files and subdirectories in /home/web/sjengle we get:
[sjengle@hrn23501 ~]$ ls /home/web/sjengle
contact.html  cs107  cs245  images      research.html
courses       cs110  cs326  index.html  teaching.html
crawltest     cs212  css    people      vitae.html
If we only want to see the files that end with .html, we can use *.html as the pattern:
[sjengle@hrn23501 ~]$ ls /home/web/sjengle/*.html
/home/web/sjengle/contact.html   /home/web/sjengle/teaching.html
/home/web/sjengle/index.html     /home/web/sjengle/vitae.html
/home/web/sjengle/research.html
Or, suppose this is the output for the images directory:
[sjengle@hrn23501 ~]$ ls /home/web/sjengle/images
background.png  exitonly.jpg    index.html      research.jpg
books.jpg       goldengate.jpg  olivetrees.jpg  sophie.jpg
If we only want to see images that start with b, we can use b* as the pattern:
[sjengle@hrn23501 ~]$ ls /home/web/sjengle/images/b*
/home/web/sjengle/images/background.png  /home/web/sjengle/images/books.jpg
The * symbol is very convenient, but also dangerous. Entering rm -rf * will delete all of your files irrecoverably (do not test this). Be careful where and how you use wildcards!
The entire wildcard example is below:

You can try out this example yourself—my web directory is readable by all users. To explain precisely what this means, we need to discuss file permissions next.
Permissions
We can change the permissions on a file or directory to change who is able to perform certain actions. You can view the current permissions of any file or directory using the ls command with the -l flag. For example, try ls -l /home/web/sjengle to display a "long listing" of the directory:
[sjengle@hrn23501 temp]$ ls -l /home/web/sjengle
total 136
-rw-r--r-- 1 sjengle faculty  3820 Jan 26  2012 contact.html
drwxr-xr-x 4 sjengle faculty  8192 Jan  7  2011 courses
drwxr-xr-x 3 sjengle faculty  1024 May 13 21:16 crawltest
drwxr-xr-x 2 sjengle faculty  1024 Nov  9  2011 cs107
drwxr-xr-x 2 sjengle faculty  8192 Apr 15 14:23 cs110
drwxr-xr-x 2 sjengle faculty  1024 Jan 16  2012 cs212
drwxr-xr-x 2 sjengle faculty  8192 Jan 13  2011 cs245
drwxr-xr-x 2 sjengle faculty  1024 Jan 16  2012 cs326
drwxr-xr-x 2 sjengle faculty  8192 Oct 31  2011 css
drwxr-xr-x 2 sjengle faculty  1024 Aug 18  2010 images
-rw-r--r-- 1 sjengle faculty  3769 Jul 14 11:43 index.html
drwxr-xr-x 2 sjengle faculty  8192 Jan 17  2011 people
-rw-r--r-- 1 sjengle faculty  1905 Jan 11  2012 research.html
-rw-r--r-- 1 sjengle faculty  3258 Jan 11  2012 teaching.html
-rw-r--r-- 1 sjengle faculty 20827 Apr 20 02:23 vitae.html
The information that is provided is (in order): the file/directory permissions, number of links, owner, group, size, last modified date and time, and name. For example, consider the following line:
-rw-r--r-- 1 sjengle faculty 3769 Jul 14 11:43 index.html
The -rw-r--r-- text gives the file permissions, there is 1 link, the owner is sjengle, the group is faculty, the size is 3769 blocks, and the last modified date and time is July 14 at 11:23am.
What does all of this mean? The owner of a file or directory is usually the user that created that file or directory. (You can change the owner using the chown command.) The owner can change the permissions of that file or directory. All users also belong to a group. For example, I belong to the faculty group and have access to certain files that also belong to the faculty group.
The permissions specify the actions that may be performed on that file or directory. The notation, however, can be confusing. The characters used are:
d: indicates the item is for a directoryr: indicates read access is allowedw: indicates write access is allowedx: indicates execute access is allowed
So, if a file has rwx permissions, then reading, writing, and executing that file is allowed. Programs are basically special files that you can execute. For example, if you did not have x permissions on the ls file, you could not execute the ls program.
The permissions mean something slightly different for directories. You are unable to access anything in a directory that you do not have r permissions for. You are unable to place folders or remove files in any directory that you do not have w permissions for. You are unable to list the files and subdirectories for any directory that you do not have x permissions for.
The order is also important. The order of the permission text is always as follows:
- 1:
dif the item is a directory or-otherwise - 2, 3, 4: whether the owner (the user category) has read, write, and execute permissions
- 5, 6, 7: whether the group has read, write, and execute permissions
- 8, 9, 10: whether everyone else (the other category) has read, write, and execute permissions
So, consider again the following file:
-rw-r--r-- 1 sjengle faculty 3769 Jul 14 11:43 index.html
Since the first character is - we know that index.html is not a directory. The owner, sjengle, has read and write permissions for that file. The group, faculty, has just read permissions. Everyone else has just read permissions.
To change permissions, you must use the chmod command (change mode). There are two different notations you can use with chmod, symbolic mode or octal mode. I'll demonstrate symbolic mode, where you use special characters to specify the permission you want to change. The characters are:
u,g,o, ora: which stands for user, group, other, or all, to specify who you are changing the permissions for. The "user" is the owner of the file, and "all" will change the permissions for the user, group, and other categories+or-: which stands for add or subtract, to either add a permission or subtract a permissionr,w, orx: which stands for read, write, and execute, to specify which permission you are changing
For example, suppose I have a file readme.txt as follows:
[sjengle@hrn23501 ~]$ ls -l readme.txt
-rw------- 1 sjengle faculty 0 Sep 15 21:23 readme.txt
I can add (+) read (r) permissions for all (a) as follows:
[sjengle@hrn23501 ~]$ chmod a+r readme.txt
[sjengle@hrn23501 ~]$ ls -l readme.txt
-rw-r--r-- 1 sjengle faculty 0 Sep 15 21:23 readme.txt
I can remove (-) read (r) permissions for just the other (o) category as follows:
[sjengle@hrn23501 ~]$ chmod o-r readme.txt
[sjengle@hrn23501 ~]$ ls -l readme.txt
-rw-r----- 1 sjengle faculty 0 Sep 15 21:23 readme.txt
Finally, I can add (+) execute (x) permissions for both the user (u) and group (g) at the same time as follows:
[sjengle@hrn23501 ~]$ chmod ug+x readme.txt
[sjengle@hrn23501 ~]$ ls -l readme.txt
-rwxr-x--- 1 sjengle faculty 0 Sep 15 21:23 readme.txt
For any of you that are groaning right now about all the shortcuts and abbreviations—just remember that the next time you type "rofl", "tldr", "ttyl", or "lmgtfy"!
Other Commands
There are several other commands you may find useful. For example, if you are logged in to a lab computer remotely and notice the computer seems slow, you may want to see if anyone else is logged into that computer. You can see all of the remote users logged into the current computer using the who command:
[sjengle@hrn23501 ~]$ who
sjengle  pts/0        Sep 15 13:33 (stargate.cs.usfca.edu)
test     pts/1        Sep 15 14:34 (stargate.cs.usfca.edu)
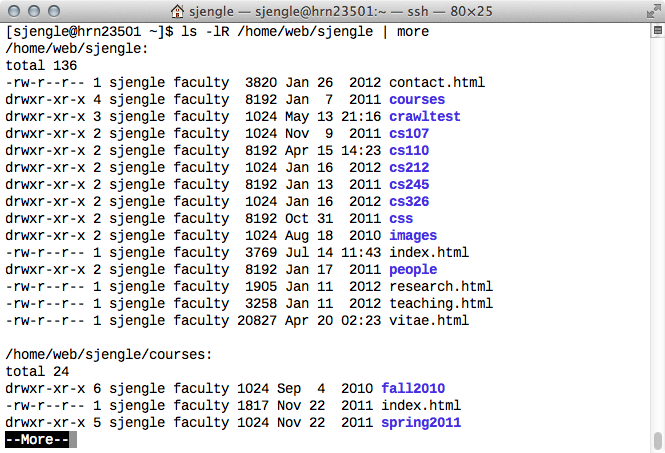
Another common problem is dealing with too much console output at once. The more and less commands are useful here. The more command will display one page of output and pause until you hit the spacebar, allowing you to easily page through input. The less command is similar, but it also allows you to scroll backwards. You can remember the difference between the two with the phrase "less is more" (indicating the less command is more powerful than the more command.
However, these commands both need to know what output it should page through. You must send output to these commands using the | pipe symbol. Think of the pipe as a "send to" function, where it the output of one command is sent to another via a pipe. For example, the command ls -lR /home/web/sjengle | more sends the output from ls -lR /home/web/sjengle to the more command. You'll see something similar to this:
Finally, the diff command will show you the difference between two files. For example, suppose we had text1.txt and test2.txt with the following content:
[sjengle@hrn23501 ~]$ cat test1.txt
ant
bat
cat
dog
elk

[sjengle@hrn23501 ~]$ cat test2.txt
ape
bee
cow
dog
elk
fly
If we want to see the difference between these two files, we can enter diff test1.txt test2.txt at the prompt:
[sjengle@hrn23501 ~]$ diff test1.txt test2.txt
1,3c1,3
< ant
< bat
< cat
---
> ape
> bee
> cow
5a6
> fly
The diff program will show which lines do not match. The < at the start of the line means the text came from the left file (in this case text1.txt) and the > at the start of the line means the text came from the right file (in this case text2.txt). The text 1,3c1,3 indicates lines 1 through 3 in both files have been changed (c). The 5a6 indicates that line 6 has been added (a) in file2.txt. This notation can be difficult to read, so you can compare files side-by-side instead:
[sjengle@hrn23501 ~]$ diff -y -W 20 test1.txt test2.txt
ant   |    ape
bat   |    bee
cat   |    cow
dog        dog
elk        elk
      >    fly
In the above output, the -y flag indicates that the files should be shown side-by-side. The -W 20 flag indicates the total column width for the output should be 20 characters. The | symbol between files indicates those lines have been changed, and the > symbol indicates there is an added line on the right side.
Text Editors
If you are logged in to a lab computer remotely, you cannot run a GUI text editor. I recommend getting familiar with some of the text editors that work from the console. There are many options, including nano, emacs, and vim. Of the three, nano is the easiest to learn and use. However, most "old school" programmers use either emacs or vim because they are more powerful, and make the task of programming easier once you learn your way around them. I personally use vim when logged in remotely.
I will demonstrate using nano here. If you want to learn emacs or vim, I suggest looking at one of the many resources available on the web.
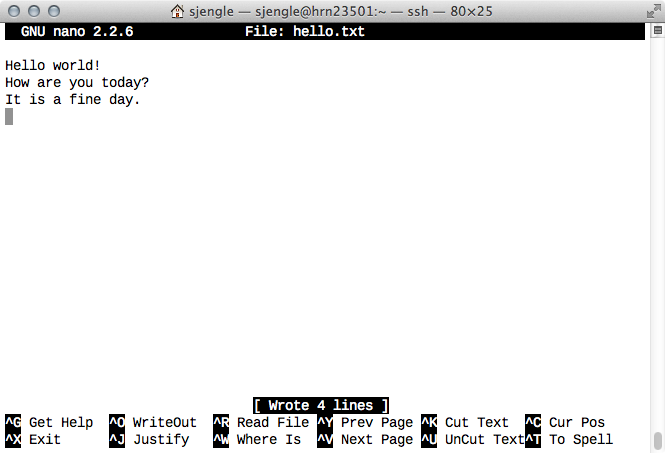
Start by entering nano hello.txt at the prompt. This will open up nano and let you start editing a file named hello.txt in your current directory. You'll see a screen similar to:

You can immediately start typing text. (In the image above, we have already started adding some basic text.) At the top middle of your screen you will see the filename hello.txt and at the bottom of the screen you will see several commands. The ^ indicates you should press the Control key plus the letter specified.
For example, to save our file, press Control and O (that is the letter O, and not the number 0) at the same time to execute the WriteOut command. You will be prompted for the filename in case you want to change it:

Press enter. You'll see how many lines nano wrote to the file near the bottom middle of the screen:
To exit, press Control and X at the same time. This will take you back to the prompt. You can verify the contents of your file with the cat command:

If you plan to do a lot of text editing remotely, I suggest you spend the time getting familiar with emacs or vim. Otherwise, you can transfer your files over to the lab computers (see other resources), and work on the files primarily on your home computer.
Other Resources
There are several Linux tutorials available on the web. Here are a few you may find useful:
The best way to learn is by doing! It may be difficult to remember everything at first, but using the command-line is faster (and better for your wrists) than clicking everywhere with a mouse.